MDM User Guide (Android)
Android
Assumptions
- Android 4.0 and later devices are fully supported. However it is advised to update your device to the latest version.
- Android devices that have Wi-Fi and VPN profiles setup will need to follow the step in this guides. Usernames and/or passwords will need to be re-entered.
- You have setup your device using a Google account. If you don't have a Google account you can sign up from your phone during setup.
Note: This account will be separate to your University of Reading staff login. Because the University has no control over the data held, please do not store any sensitive information on the services they provide. You can use your University of Reading email address to subscribe if you want to, but use a different password
Before you start
When you enrol your device will setup the following security measures:
- Set a PIN or password if you have not already, so do so when asked. Make sure you remember your PIN as if you get it wrong 10 times in succession your device will be wiped
- Your device will be encrypted. You may need to connect your device to a power source and have the battery at more than 80%. The device may need to restart to perform the encryption. Please follow the prompts.
Enrolment
The following steps will take you through the process of enrolling an Android device with SCCM and Intune
1. Power on your Android Phone/Tablet
2. Open the Play Store application
3. Search for the 'Company Portal' using the keyboard and tap the magnifying glass

4. Tap 'Intune Company Portal'

5. Tap Install

6. Tap Accept

7. Tap Open

8. Tap Next

9. Enter your email address, this will redirect you to the University login page

10. Enter your username and password and tap sign in

11. Tap activate to start device enrolment

12. On Samsung Devices read the privacy policy, tap the check box to acknowledge your understanding and tap confirm to complete device enrolment

Connecting to UoR Wi-Fi
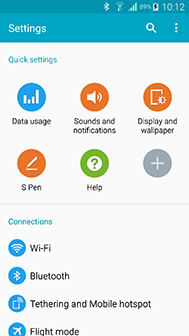
1. Our example uses a Samsung Galaxy Note 4, on most android phones you can access your Wi-Fi settings by either:
- Dragging the top of the homescreen down and pressing the cog symbol (setting symbol), then choose the Wi-Fi connection settings.
- Go to your apps and find the settings shortcut, then choose Wi-Fi

2. Select Wi-Fi
3. If not already connected select 'eduroam' and select 'Connect'

4. When prompted for credentials enter your username (username@reading.ac.uk form) account under Identity. Scroll down and enter your password

5. Select 'Connect'
Connecting to University of Reading VPN
Once the enrolment is complete, Intune will automatically deploy the University of Reading VPN profile to your device. To complete the VPN configuration please follow the steps below.
The following steps are only needed if you would like to use the University of Reading VPN on your device through the Pulse Secure app. The Pulse Secure app will enable to access secure IT services through your mobile device as though you are connected to the campus network. If you do not need the VPN then you do not need complete these steps.
1. Load the company Portal Application (Comp Portal)

2. Select 'All Apps'

3. Select Junos Pulse and choose 'VIEW IN GOOGLE PLAY', if asked Open in 'Play Store'
4. Install the application, then close the Play Store, or press your Home button.
5. Open a Browser and enter the address: webvpn.reading.ac.uk

6. Enter your University username and password (Only your username is required)

7. Select 'VPN'

8. Accept the EULA
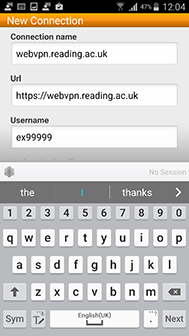
9. In 'New Connection' complete the following:
- Enter Username (username only)
- Scroll down and select 'Create Connection' When prompted to 'Allow Connection' select 'OK'

10. Connecting to UoR VPN
11. Load the Junos Pulse application and select 'Connect'

12. Enter your password and select 'Sign In'

13. After a few seconds the status will say 'Connected'

14. Sign Out to disconnect the VPN connection
- Windows Phone
- iOS (iPhone and iPad)
- Android
- Troubleshooting
